Design Brief
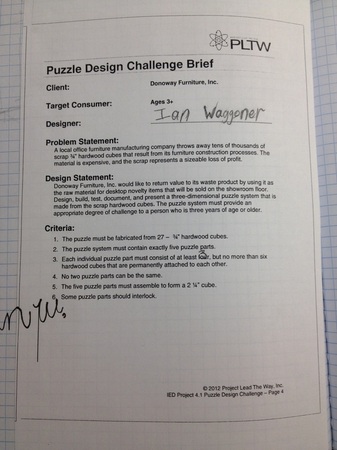
The cube had to be 3 by 3 by 3 cube using 27 cubes, each cube had to lie within 2 standard deviations of the entire data. If one cube was outside the 2 deviations it had to be replaced. The cube had to be composed of 5 individual pieces of 3 to 6 cubes. the pieces had to be interlocking as well. No two puzzle pieces could be congruent also.
The cube had to be 3 by 3 by 3 cube using 27 cubes, each cube had to lie within 2 standard deviations of the entire data. If one cube was outside the 2 deviations it had to be replaced. The cube had to be composed of 5 individual pieces of 3 to 6 cubes. the pieces had to be interlocking as well. No two puzzle pieces could be congruent also.
Microsoft Excel
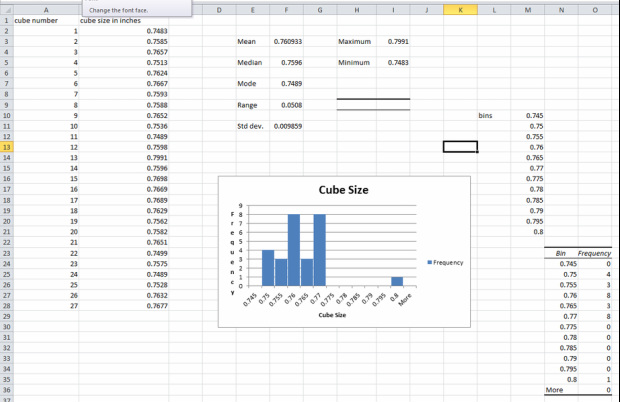
We recorded the sizes of our cubes in an Excel sheet. And since Microsoft Excel is AMAZING we were able to find all the central tendencies and standard deviation quickly and easily. Excel is mans best friend when it comes to math!
We recorded the sizes of our cubes in an Excel sheet. And since Microsoft Excel is AMAZING we were able to find all the central tendencies and standard deviation quickly and easily. Excel is mans best friend when it comes to math!
|
Sketches
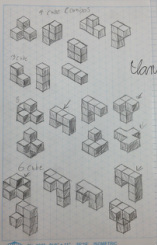
First we drew sketches of different possibilities of the 5 shapes we had to use. we drew ones with 3, 4, 5, and 6 cubes. |
|
Sketches cont.
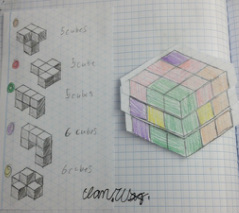
once we finished drawing sketches we chose 5 of them that would combine into the cube. |
Inventor Modeling
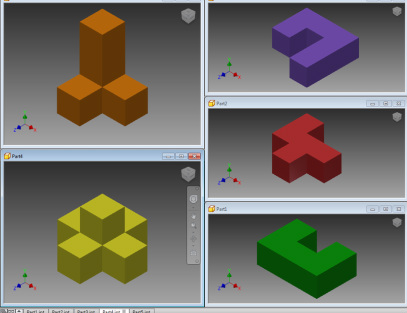
By using Autodesk Inventor Pro we were able to create our cubes pieces with 3D modeling. each piece was made individually inside a project labeled as Puzzle cube. We were able to color them, re-size them and many other things.
first we made a 2D sketch then we were able to extend the shape upwards, changing it from 2D to 3D.
|
|
Inventor Drawings
In inventor pro we were able to create orthographic drawings simply by telling it which part to do, and in four clicks the drawing was finished! Then once we had created the animated design of our cube we could put the exploded cube into a drawing as well. (shown on slide 6) |
Inventor Assembly
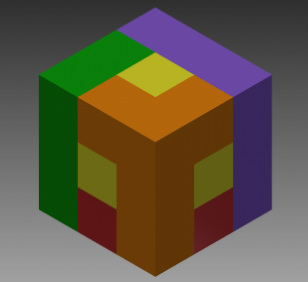
Then we were able to put all five pieces into the same file. then by constraining the pieces together and limited the 6 freedoms of movement we attached the pieces together to form our final cube.
Then we were able to put all five pieces into the same file. then by constraining the pieces together and limited the 6 freedoms of movement we attached the pieces together to form our final cube.
Inventor Presentation
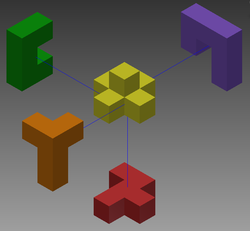
Using inventor we could animate our cube to show how the cube went together. I extended the piece along an axis 3.5 inches and then had it reassemble into the original cube.
Using inventor we could animate our cube to show how the cube went together. I extended the piece along an axis 3.5 inches and then had it reassemble into the original cube.
Reflection
- For this project we had to create a fun puzzle in the form a cube that could be created from 27 left over wood cubes. Each cube had to three fourths of an inch in every direction. The puzzle it self had to be comprised of exactly five pieces.
- We started by drawing sketches of different shapes made of 3 to 6 cubes.
- Then we tested them until we found a solution; a set of five pieces that fit together to form a 3x3x3 cube.
- With the pieces in our minds we created them and tested each others cubes to see if they were easily solved.
- Afterwards we created the virtual cube in Autodesk Inventor Pro.
- This project taught us many things like how to use Autodesk inventor, how to dimesnion detailed drawing and how to use Microsoft Excel.
